Piano restoration, part 2

Howdy all,

Time to start taking things apart.  I didn’t know it at the time, but there were some measurements I should have taken first, but I didn’t.  More on that later.

So, first the action comes out:

piano-5

piano-6

piano-7


Then I took some measurements of the string height.  I’ll be taking these again when the new strings are installed, but it doesn’t hurt to do it now too.


piano-12

piano-13

Then the dampers come off:

piano-14

piano-15

and go in a rack I made for them out of PVC pipe:

piano-16


Now the strings come out:

piano-17

piano-18

Here you can see how dirty and nasty the old strings and tuning pins were:

piano-19

piano-20

The bass strings are taken off first:

piano-21

piano-22

piano-23

and put on a wire, being careful to keep them in the correct order:

piano-24

The plain steel wires are simply cut off and thrown away.  First though, I measure them and make notes of where the string gauges change.

piano-25

piano-26

piano-29

piano-30

piano-31

To be continued…

Piano restoration, part 1

Hey all,

Well, it’s been awhile!  About 4 years to be exact, since I last posted here.  Not much has changed in my life.  I’m still making knives for a living, and dabbling in musical instruments for fun.  I’ve only been making about one instrument a year.

I recently did a little work on a baby grand piano that has been in my family for a long time.  I believe my grandfather got it for his 12th birthday, which was in 1936.  He had it for about 50 years, then my mom had it for about 20 years, and my aunt has had it for about 15.

He played it a LOT, and it shows.  It’s pretty worn out.

I tuned it, and did a little regulation work on the action.  It was better, but still needed a lot of work.  I offered to do the work for free, if my aunt would buy the parts needed.  She was willing, so about a week ago, I moved the piano from her house to my workshop.

I thought I’d document what I’m doing to it, and the blog needs some life breathed into it, so I’ll post it here.

Here’s a few pics of the piano before I started taking it apart.


piano-1piano-2piano-3piano-4

It’s a Schumann, most likely built either in Rockford Illinois, or Bluffton Indiana.

I’ll be putting new strings on it, and painting the harp, and a bunch of other things.

Thanks for reading!  More to come soon.


Camera kit for sale

Hey all,
I have a Canon T3 crop sensor DSLR camera for sale, along with two lenses. This is a great kit. I’m only selling it because I just upgraded to a full frame body. So I don’t need this body, and the two lenses won’t work with my new one. Too bad, because I REALLY like the 18-135mm STM lens. It’s a great do-all lens.

I bought this body in July of 2014, and the upgraded lens a few months later. I’m not sure what the exact shutter count is, but I think it’s between 4 and 5 thousand.

The body and lenses are in excellent, like new condition, except for a few minor scratches on the body. I’ve taken very good care of it. It’s never been dropped or anything like that.

Both lenses have caps, and the body as well.

This lens came with the body. I’ve not used it much at all, though it takes good pictures. You don’t really need it, because the other one is much better, so my advice is to sell it and buy some filters or a hood or something.

Here’s both lenses you’ll be getting:

All this comes with it. I never filled out the warranty/registration, so I’m including them. I don’t know if you’ll be able to use them though.

A couple cables. One is the USB cable for hooking up to your computer, I think the other is an A/V cable for TV hookup.

I’m also including the battery charger (forgot to take a picture of it) and a 32G Sandisk SD card.

I’m asking $500. I can take paypal or check/MO.

If you’re interested, just post a comment, or email me.

Year end review, a bit late.

Hey all,

Yes, it’s that time of year again. Actually, it was several months ago, but anyway…

Here, in chronological order, are all the knives I made last year, except a few that I might not have taken any pictures of.

Thanks for looking, and comments and critique are welcome.

Building a Hammer Dulcimer, Part 5

Hey all,
I’ve had a number of requests for some more information, mainly dimensions and angles. I’m sorry I haven’t answered those comments yet, but I am now.

So here’s a picture of a drawing (not to scale) showing the angles and sizes:

120515-4

That should be enough to get y’all started. I suggest before you start cutting wood, that you make a complete drawing of your project, showing where all the parts will be. This will save you a lot of heartache later. You can do this on a large sheet of paper, or on the plywood you’ll be using for the back.

Here are some other questions someone sent me, along with my answers. Some of you might find them helpful:

Hi sir, I wanted to thank you for your post on making the Hammered dulcimer. I have been looking for help like that for a while. I have some questions if you would tolerate them.
First I am going to make my own dulcimer and want to make as big a dulcimer as I think I will grow into. What are the dimensions of the backboard and what were the angles?
Would you add to the top or bottom if you were going to a 19/18 dulcimer? How well did the steel rods work versus cross braces of wood? I didn’t see how big they were other than a good guess. Also did you make a groove for them or were they allowed to move freely across the braces?
How deep did you sink the tuning pins and how deep did you set the holes?

How do you locate the bridges?

My answer:

The steel rods work fine, but you want to get them situated right fairly quickly. Over time they tend to get pressed into the bottom of the soundboard a little, and then they are hard to move without loosening the strings.
They float freely on the braces, but of course are held in place by string tension.
I wouldn’t use any smaller than 1/4”, with 3/8” being about perfect. The diameter of the rods you use will determine the height of the braces, so you need to be aware of this relationship as you build.

Whether you add strings to the top or bottom to expand the instrument is up to you. There’s more limitations at the high end. When the strings get really short, they are harder to tune, and don’t sound as good.

I drill the holes for the tuning pins about 1” I think. It’s not real important. You just don’t want the pins to bottom out, and you don’t want to drill through the back of the instrument. 1-1/2” should be fine.
I hammer in the pins until there’s about 1/4” of thread showing.

The treble bridge is exactly 2/5 from the left nut.  The bass bridge location is not as critical.  I locate mine about 1/3 from the right nut.

I hope this answers all the questions. If not, please ask them in the comments box, and I will try to answer them in a timely fashion.

Phillip

What do you want from me?!

How’s that for an eye catching post title?

It’s been a long time since I posted anything here.  I’m not really sure what to post about.   I could post about everything that happens in my life like so many on social media do, but I have better things to do with my time, and most readers would be bored to tears anyway.  Also I prefer to keep my private life off of the Internet, so that pretty much limits my posts to stuff that I make.   So, I’m wondering, what would you, my readers, like to see on here?  More tutorials?  More pictures?  More knife content?  More about my other hobbies?  Political or theological commentaries?  All of the above?  None of the above?  I am open to your suggestions.  🙂

Years end review

Hey folks,

This is a little late, (obviously) but each year around New Years I like to post all the knives I made that year at once, in case I missed any throughout the year.  I missed most of them last year.  😉  So here we go, all the knives I made last year in chronological order.

Butterfly pattern bowie. About 10″ blade, ironwood handle.

Bronze short sword with braided leather lace grip.

Dagger to go with short sword.

This blade had some flaws in it, so I put a cheap handle (locally grown walnut) on it and keep it around for a beater knife.

Part of a custom set for someone. This one had a 12″ blade, damascus guard, and I think claro walnut handle.

The second knife in the set mentioned above. Same materials but 8″ blade.

Hunter/camp knife. Ironwood handle, twist damascus blade.

Small bowie. Amboyna burl handle.

Custom fighter. 9″ blade, ironwood handle, twisted laddered W’s pattern.

My first F-S (Fairbairn-Sykes) dagger. Cocobolo handle, damascus blade and fittings. Went to Greece.

Bowie. The blade is 25,000 layers of W2, wrought iron, and 15n20. Ironwood and stainless handle.

Camp knife. G10 and W2

Hunter. Brown micarta.

A bunch of hunters and a camp knife.

Ivory micarta:

Black micarta. I think the blade was forged A2.

Carbon fiber:

Natural micarta:

Walnut:

Twin sister to the other camp knife:

Two hunters. One green, one brown.

Another F-S dagger. Natural micarta, with texture. Blade probably O1.

Yet another F-S dagger. The are kind of fun to make. This one has all brass grip.

Santoku. Don’t remember the blade material, but the handle is maroon micarta.

Another brown micarta handled hunter.

Another big camp knife. Green micarta handle.

Maroon micarta hunter.

Chefs knife, lignum vitae handle, the blade was AEB-L

Another chef knife. The blade is W2/410 laminate. Ironwood handle.

Coffin handled fighter. Kind of a warm-up for the one a few pics down.

Hunter. Brown and black micarta.

Another F-S dagger. Green micarta grip, titanium guard.

Slim fighter. Stabilized amboyna handle.

Custom ring guard coffin handled fighter. Probably the most difficult to make knife of the entire year. Ugh. People who make this sort of thing regularly sure have my respect and admiration. (and sympathy)

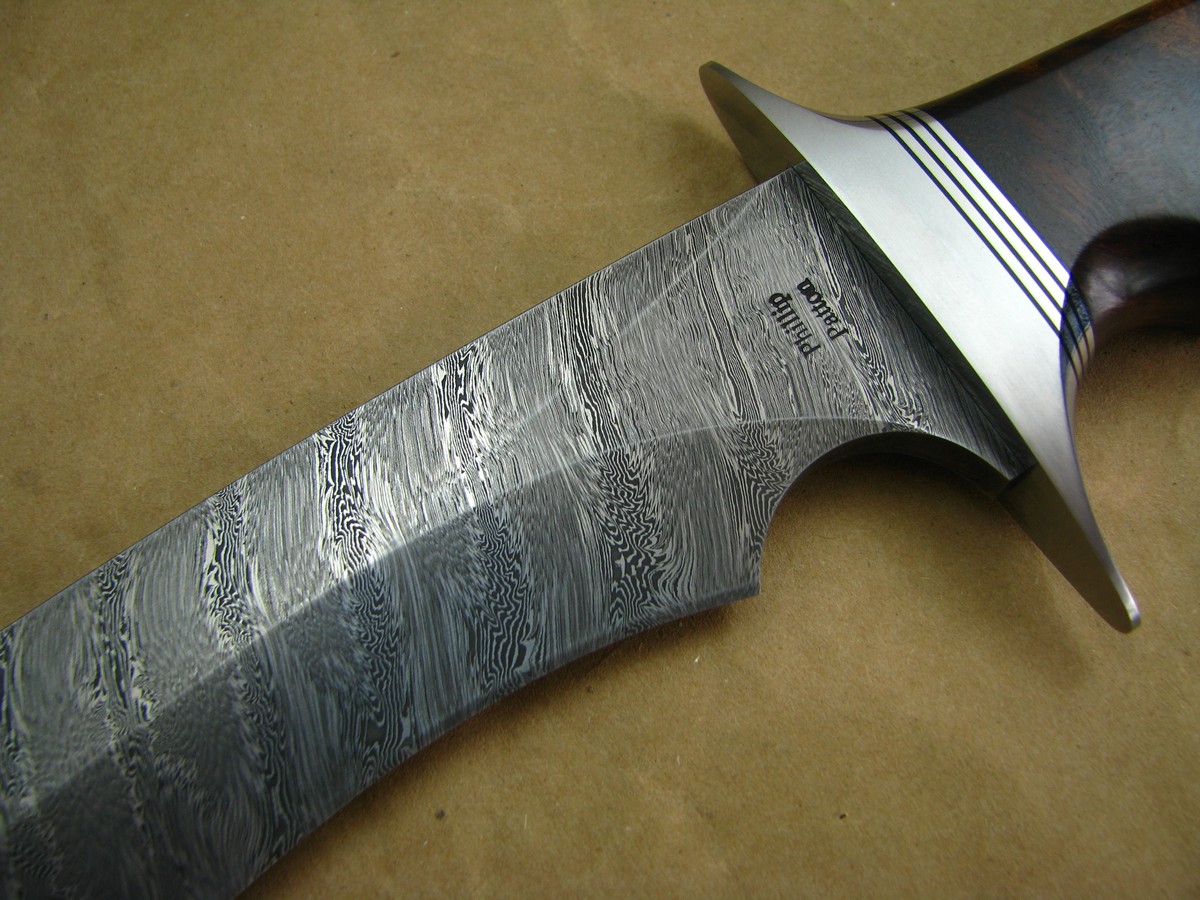
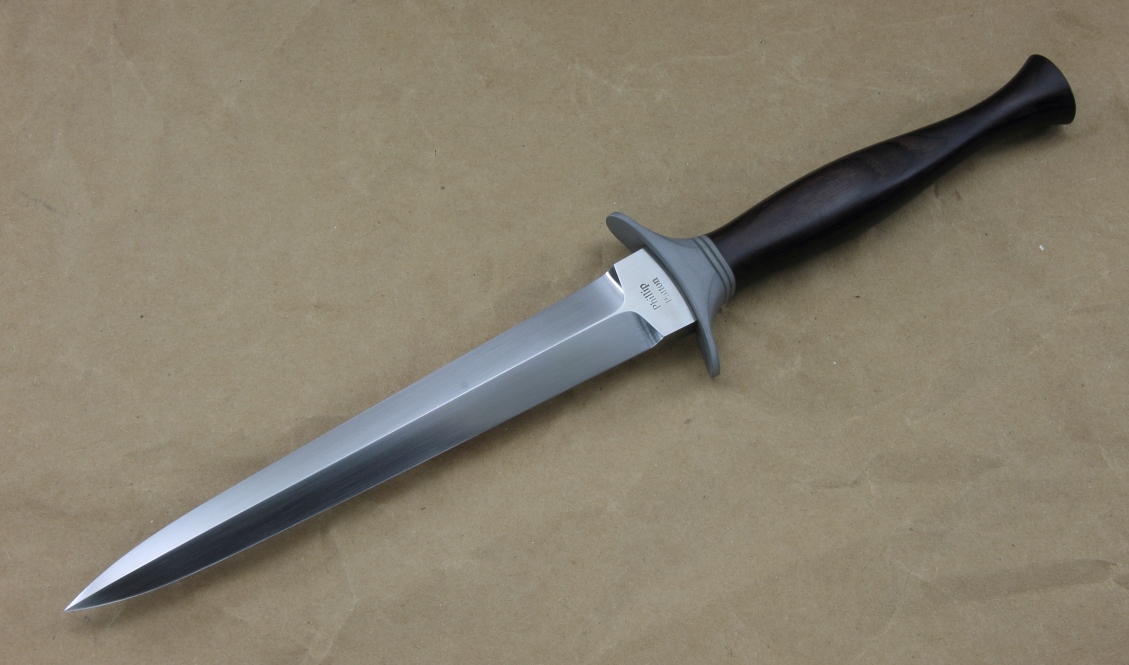
Another dagger, based on the F-S design, but with a Patton-ized handle. Handle is stainless and african blackwood.

Hunter. The handle is curly maple, dyed. I think the blade is D2.

Custom camp knife. Blade is turkish twist, handle is carbon fiber.

My first kukri. It’s my take on Jason Knights version. I didn’t get Jasons permission to imitate his work, because I only made one, and I didn’t sell it, I gave it away as a gift  (as mentioned in my last post). Hope he doesn’t mind.

Bowie. Twist damascus blade, african blackwood handle. I think the steels used were O1 and L6.

Fighter. Desert ironwood handle, bronze guard and spacers. The blade is the rest of the 25,000 layer billet.

My first seax. Not quite finished yet, but close enough for photos. The handle is cocobolo and copper. The blade is a four bar composite.

Another W2/410 laminate. Stainless bolster, ironwood handle.

Hunter. The handle is african blackwood, the blade is butterfly W’s.

Another AEB-L chef’s knife. Ironwood handle.

A paring knife I made for my mom. 154CM blade, turquoise micarta handle.

Dressy santoku. Bronze guard, ladder pattern damascus blade, ironwood handle.

And the last one.  I actually finished it in January, but most of the work was done in 2014.

It’s another kukri, obviously, but this time more along traditional lines. Except for materials.

Hey all

Hard to believe it’s been almost 6 months since I posted anything.  I’m surprised this blog still gets hits.  😉

Soon, I intend to make a longer post sharing more of what I’ve been up to this year, but for now I just want to feature the latest knife I made.

It’s a khukuri, which is a traditional knife from Nepal.

Here’s a little back story:
Several years ago a friend gave me a broken leaf spring from his truck. I forged out a few hunter blanks, intending to finish them out and give them to him and his sons. Since then, I must have got rid of a couple, and then this week I tried to finish the other one, but it died in the heat treat. So I forged what was left of the spring into this monster instead. It’s the first knife I’ve fullered. I don’t have all the dimensions handy, but I can say that it finished up at 5/16″ thick. Pretty darn heavy. I wouldn’t want to get in a knife fight with this on my side… But I doubt my friend will use it for anything, anyway. Should be a great chopper. I’ll do some cutting with it tomorrow.

Latest work

Here are the pictures of the knife I mentioned in my last post. It has 25,000 layers of W2 and wrought iron. At that layer count, you can’t see the layers, like on a regular damascus blade, so I tried to heat treat this one with a hamon, but it didn’t turn out as interesting as I’d hoped. You can see some of the wood grain pattern from the welding though.

The blade is 9-1/8″ long, and about 5/16″ thick at the guard, with some serious distal taper. The clip is sharpened, and the blade is finished to 1000 grit. The guard is stainless, with the insides of the lugs mirror finished. The handle is ironwood.

This one is going to Australia.

And here is a recurved utility in W2 and G-10:

And lastly, a couple hunters. Both blades are 52100. One handle is ivory micarta with red liners, the other is green canvas micarta.

The last three are available for sale, btw.

Thanks for reading,

Latest knife

Howdy all,
Here’s my most recent knife. It’s a 9″ recurved fighter, with a desert ironwood handle, and the blade is twisted, laddered, W’s.

Soon I’ll be posting about an interesting project I’ve been working on. A knife with 25,000 layers in it. Should be ready in a few days.